Frozen Shoulder Stages: Which Stage Are You In?

Frozen Shoulder Stages: Which Stage Are You In?

One of the annoying feelings that can happen during your regular activity is realizing that your shoulder is no longer providing total mobility. Even basic activities like combing your hair or pulling the seat belt send a sharp sensation. And with each passing day, it is getting worse. 

Comprehending the particular stage of your frozen shoulder is crucial because each stage comes with new formats of treatment. The earlier you identify the root cause, the better. While the condition generally causes persistent pain and progressive stiffness, it moves through three distinct predictable phases. 

In this article, we will discuss the same in detail, with some deep insights, so that you can take the best step today to lead a better life tomorrow. 

What Is Frozen Shoulder?

More formally called adhesive capsulitis, it is when the strong connective tissue capsule surrounding the shoulder becomes thick, stiff, and inflamed, resulting in a loss of the lubricating fluid needed for ease of movement in this joint. 

Therefore, when your shoulder freezes, you haven’t simply lost the ability to move your arm, but have also severely limited your ability to perform daily tasks, such as dressing, reaching for items on high shelves, or sleeping on your side. While anyone can develop frozen shoulder, you’re at a greater risk if you have recently endured a limiting medical condition that prevents your use of your arm (e.g., stroke, mastectomy), or if you have a systemic illness (e.g., diabetes, thyroid disease).

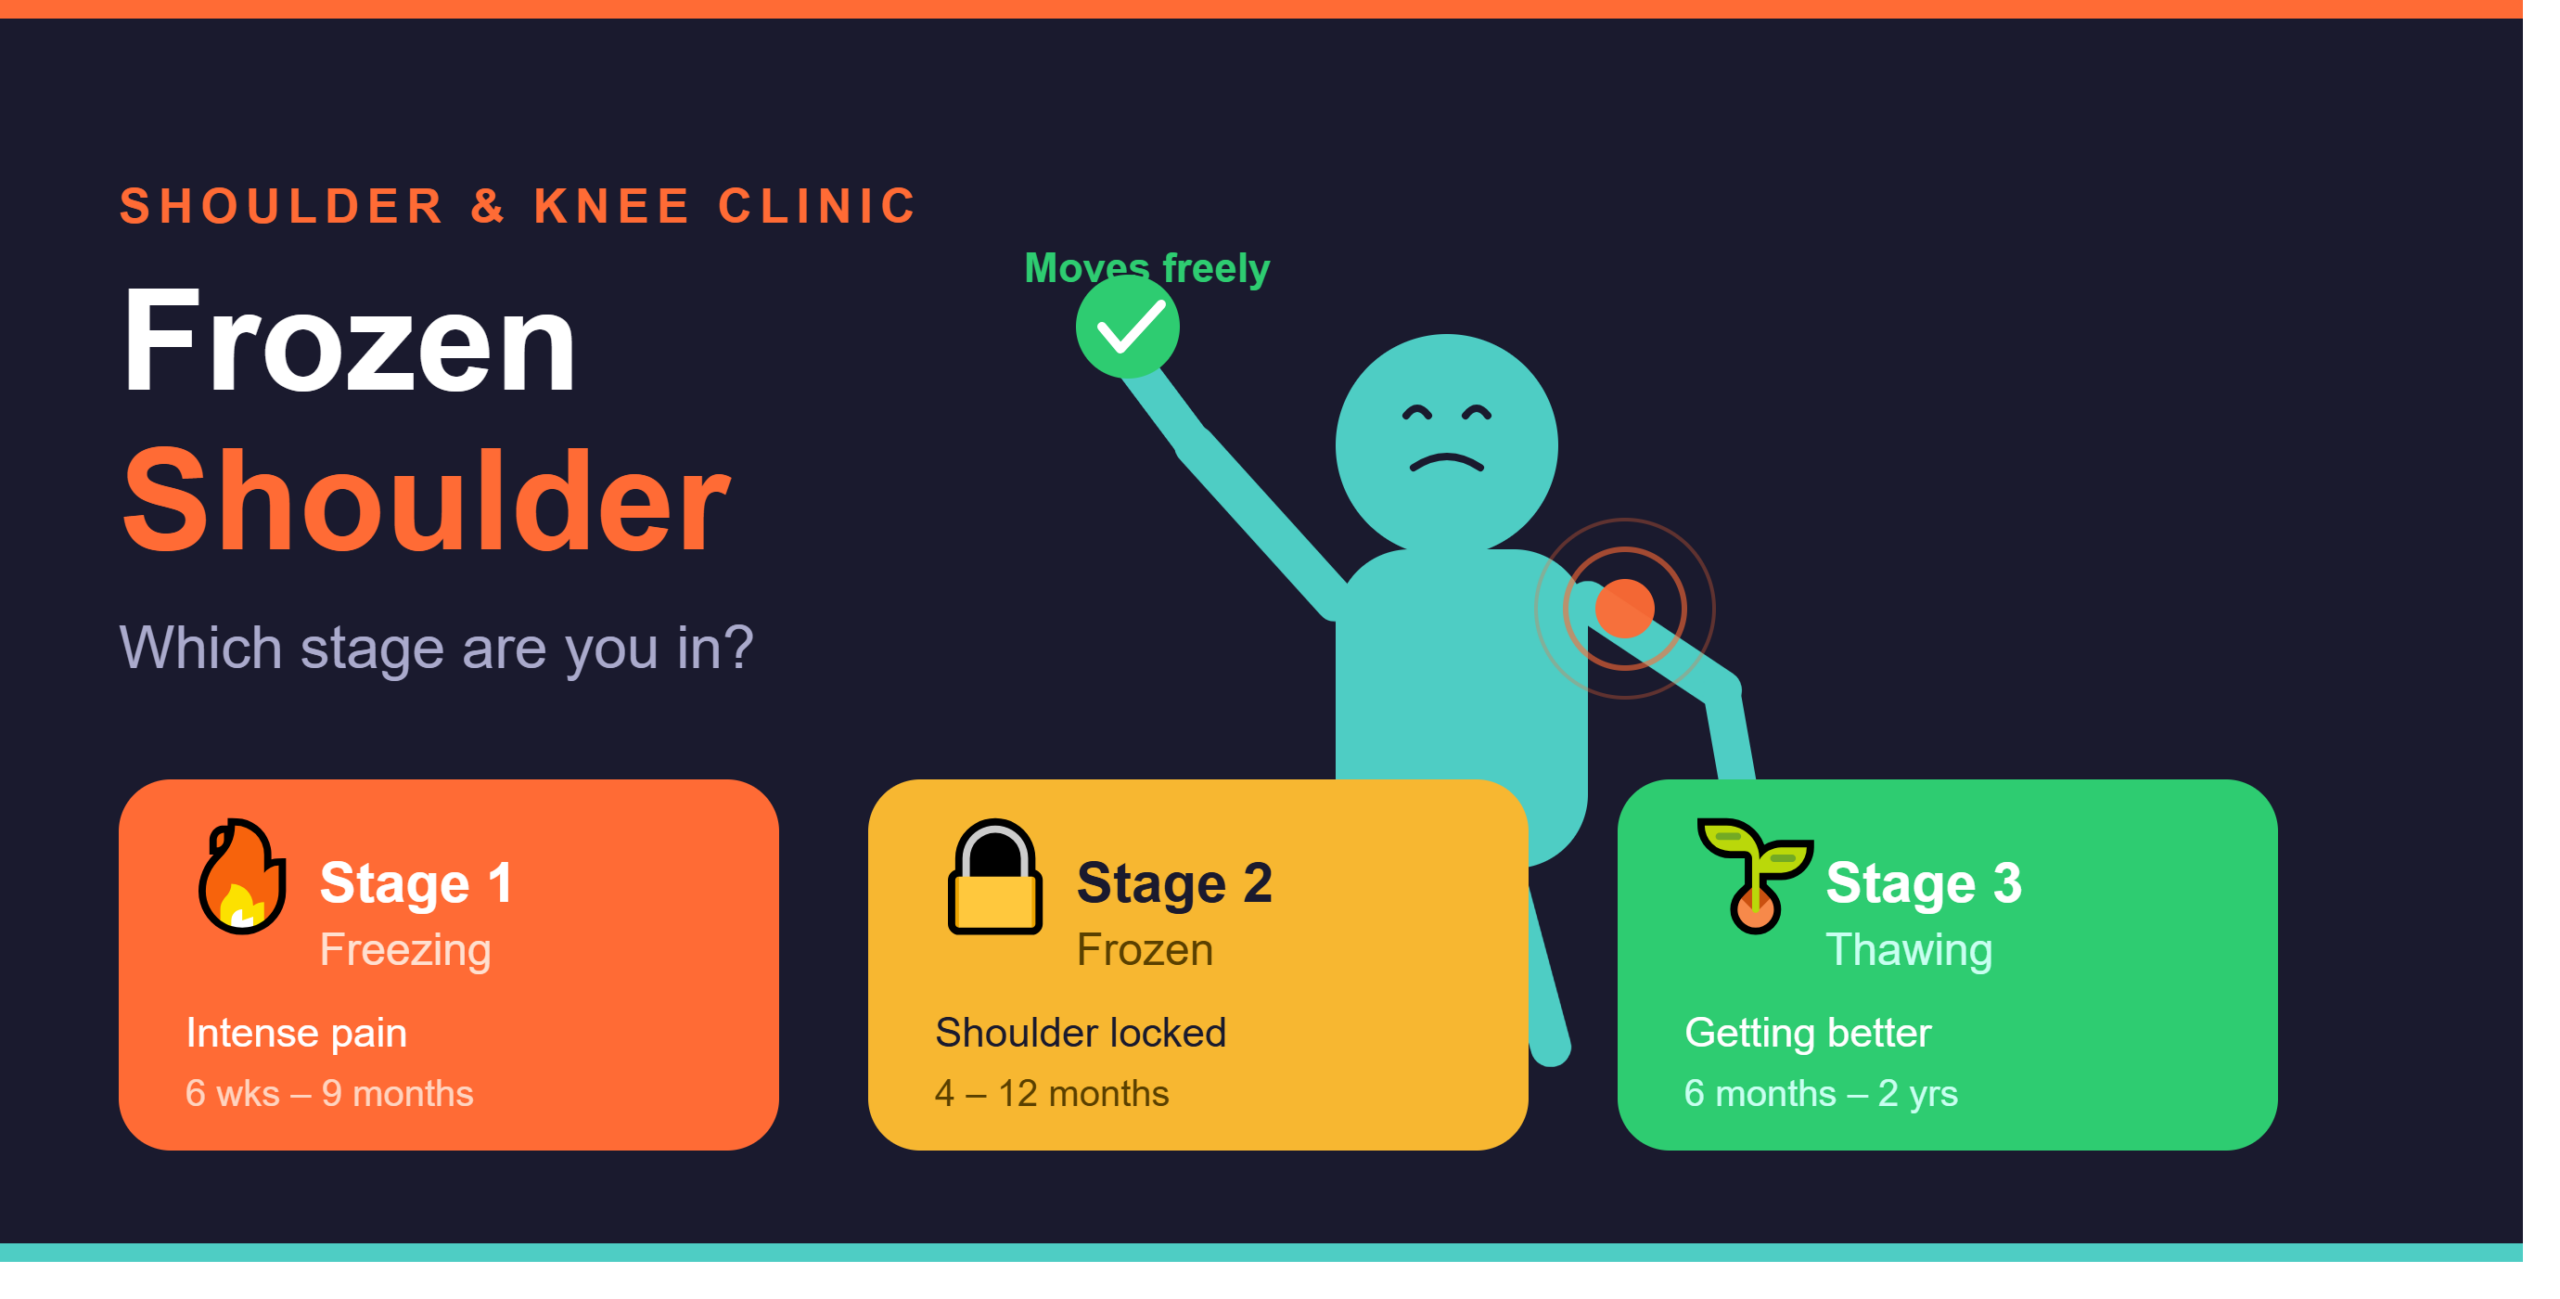
Stage 1: Freezing Phase (Excruciating Pain Expected)

This freeze phase of a frozen shoulder can be extremely distressing because many people are caught off guard with the sudden appearance of nagging pain that increases over time. 

  • Symptom Characteristics : This phase of a frozen shoulder will cause you to have more pain as the shoulder moves through various movements. You may also experience significant achy pain at night while sleeping and waking. 
  • Everyday Impairments : Activities that require overhead reaching or behind-the-back movement become progressively more difficult to perform. 
  • How to Help : Pain management is the main focus during the phase, which is inclusive of subtle, pain-free activities. Pushing through severe pain does not stop the freezing process and actually may worsen the inflammation.

Stage 2: Frozen Stage (The Hardened Phase)

At the second stage of this ailment, there is a change in the nature of your shoulder symptoms from sharp, ongoing pain to more consistent levels with considerably more stiffness. 

  • Traits : Your shoulder joint is now very tight and enshrined in its own capsule. The pain during rest will go down, but the inability to move this joint is going to be noticed much more dramatically. 
  • Daily life : will become extremely challenging for you as your shoulder mobility is limited so much. Even very simple tasks such as bending down will be almost impossible to accomplish without using your entire body to compensate. 
  • Nursing : With the joint being so stable in its position and locked, the treatment at this stage should be with specific physiotherapy. Try the stretching exercises as and when recommended by an expert. 

Stage 3: Thawing Stage (The Recovery Phase)

The thawing phase represents the final stage, and it is characterized by hope and a gradual return to normal function. This is when your shoulder will begin to thaw out, and you will feel more comfortable. 

  • Signs/ Symptoms : You will notice a gradual decrease in your stiffness and an ease in normal function.
  • Recovery Expectations : You will see improvements in your shoulder’s range of motion at a slow and steady pace. You will need to be patient, as versatility and strength don’t rejuvenate by the hour. 
  • Importance of Continuity : You must stay committed to your physiotherapy and home stretching routine during this critical period. By continually working on your joints, you will maximize your range of motion. 

How long does a Frozen Shoulder take to Heal? 

This ailment is known for a very slow progression. The normal duration for a frozen shoulder is from one year to three years maximum in order to run its full course. 

StageTypical Duration
Stage 16 weeks to 9 months
Stage 24 to 12 months
Stage 36 months to 2 years

The time it takes you to recover in this case is influenced by your general health, how much you commit to physical therapy, and any other pre-existing conditions you have, such as diabetes. If diagnosed early enough, you can receive curated solutions, be more comfortable, and possibly shorten the length of the healing timeline.

Frozen Shoulder Treatment Options

Your treatment pathway will be shaped by how far along you are in your recovery. Some of the more conservative treatment options include: 

  • Activity Modification : Learning how to modify your lifting or reaching habits so as not to place stress on the joint. 
  • Pain Medication : Using anti-inflammatory medications to help control pain, particularly in the initial phases of pain where it is the worst. 
  • Physiotherapy : Participating in specially designed stretching exercises to help maintain or slowly regain your range of motion. 
  • Injectables : Corticosteroids can help you significantly reduce inflammation and provide you with considerable relief from pain during the uncomfortable freezing phase. 
  • Advanced Treatments : Should conservative treatments not result in pain relief even after several months, your specialist may recommend advanced treatments, such as hydrodilatation or arthroscopic surgery. 

When should you call a doctor? 

Shoulder pain lasting longer than a week and unrelenting stiffness are both reasons to seek help. If you find that you are dressing differently due to shoulder pain, are unable to sleep at night, or have trouble lifting your arm even though you’re trying very hard to do so, you need to see a specialist. 

A doctor who specializes in frozen shoulder will accurately assess your condition by imaging tests and medical history. This will prevent you from undergoing certain treatments that may exacerbate your existing injury and guide you safely through the healing process.

Final Takeaway

The earlier you understand the stage of your frozen shoulder issue, the easier it gets to navigate through your recovery process. Though it is a time-taking methodology, most patients have reported that they regained normal shoulder mobility after the complete treatment plan. 

If you are still confused about where to start your shoulder healing journey, you can book a consultation with the best orthopaedic surgeon in Mumbai today. Try our seamless platform shoulderandkneeclinic.com for a prompt appointment booking experience. 
Patch Augmentation vs Traditional Rotator Cuff Repair: Benefits, Risks & Outcomes

Patch Augmentation vs Traditional Rotator Cuff Repair: Benefits, Risks & Outcomes

If you are finding it difficult to move your arm or do basic work like lifting books or fetching kitchen utensils from the shelf, you might be suffering from a rotator cuff tear. Rotator cuffs are nothing but a relative family of tendons and muscles that help you do the basic shoulder movements. So, a tear occurs when tendons yield from your arm bone. But nothing to worry about because every medical issue has a treatment, right?

Of course, you will be diagnosed and based on that, your treatment will initiate, but you should know that the course of action will depend on the degree of tear. Subsequently, there are two modes of treatment processes- (a) traditional repair, (b) path augmentation.

In this article, we will take a deep dive into patch augmentation vs rotator cuff repair, and also unlock some insights that will help you make an informed decision.

Traditional Rotator Cuff Repair

In this procedure, your surgeon will insert an arthroscope (micro camera) through a small incision in your shoulder. He or she refers to images derived from the camera to perform the procedure. Ultimately, your surgeon will implement sutures and an anchor to refasten the torn tendon directly back to the bone.

This methodology is best suited for:

● Minimal tears: Where the gap is manageable, and the tendon can be pulled back to the bone without excessive tension.

● Healthful tendon tissue: When your tissue is thick and strong enough to hold the sutures firmly.

The ultimatum of this procedure is to revive the original anatomy of your shoulder by allowing the tendon to heal naturally to the bone. And success is noted when the patient reports a full range of motion.

 Patch Augmentation

It’s appropriate for conditions that need special support for the tendons. It basically involves fixing a biological or synthetic “scaffold” over the repaired tendon. Think of it as reinforcing an abraded segment of fabric with a robust backing to prevent it from tearing again.

Why this patch is incorporated:

● Extra Support: It provides mechanical strength to the repair site while your body works on biological healing.

● Healing Induction: Several modern patches act as a “bio-inductive” bridge, encouraging your body to grow new, healthy tissue into the patch.

This procedure is appropriate for:

● Substantial Tears: Patch augmentation success rate is high where the tendon has retracted significantly.

● Weak or Degenerated Tissue: Often seen in chronic tears or older patients, where the “meat” of the tendon is thin or frail.

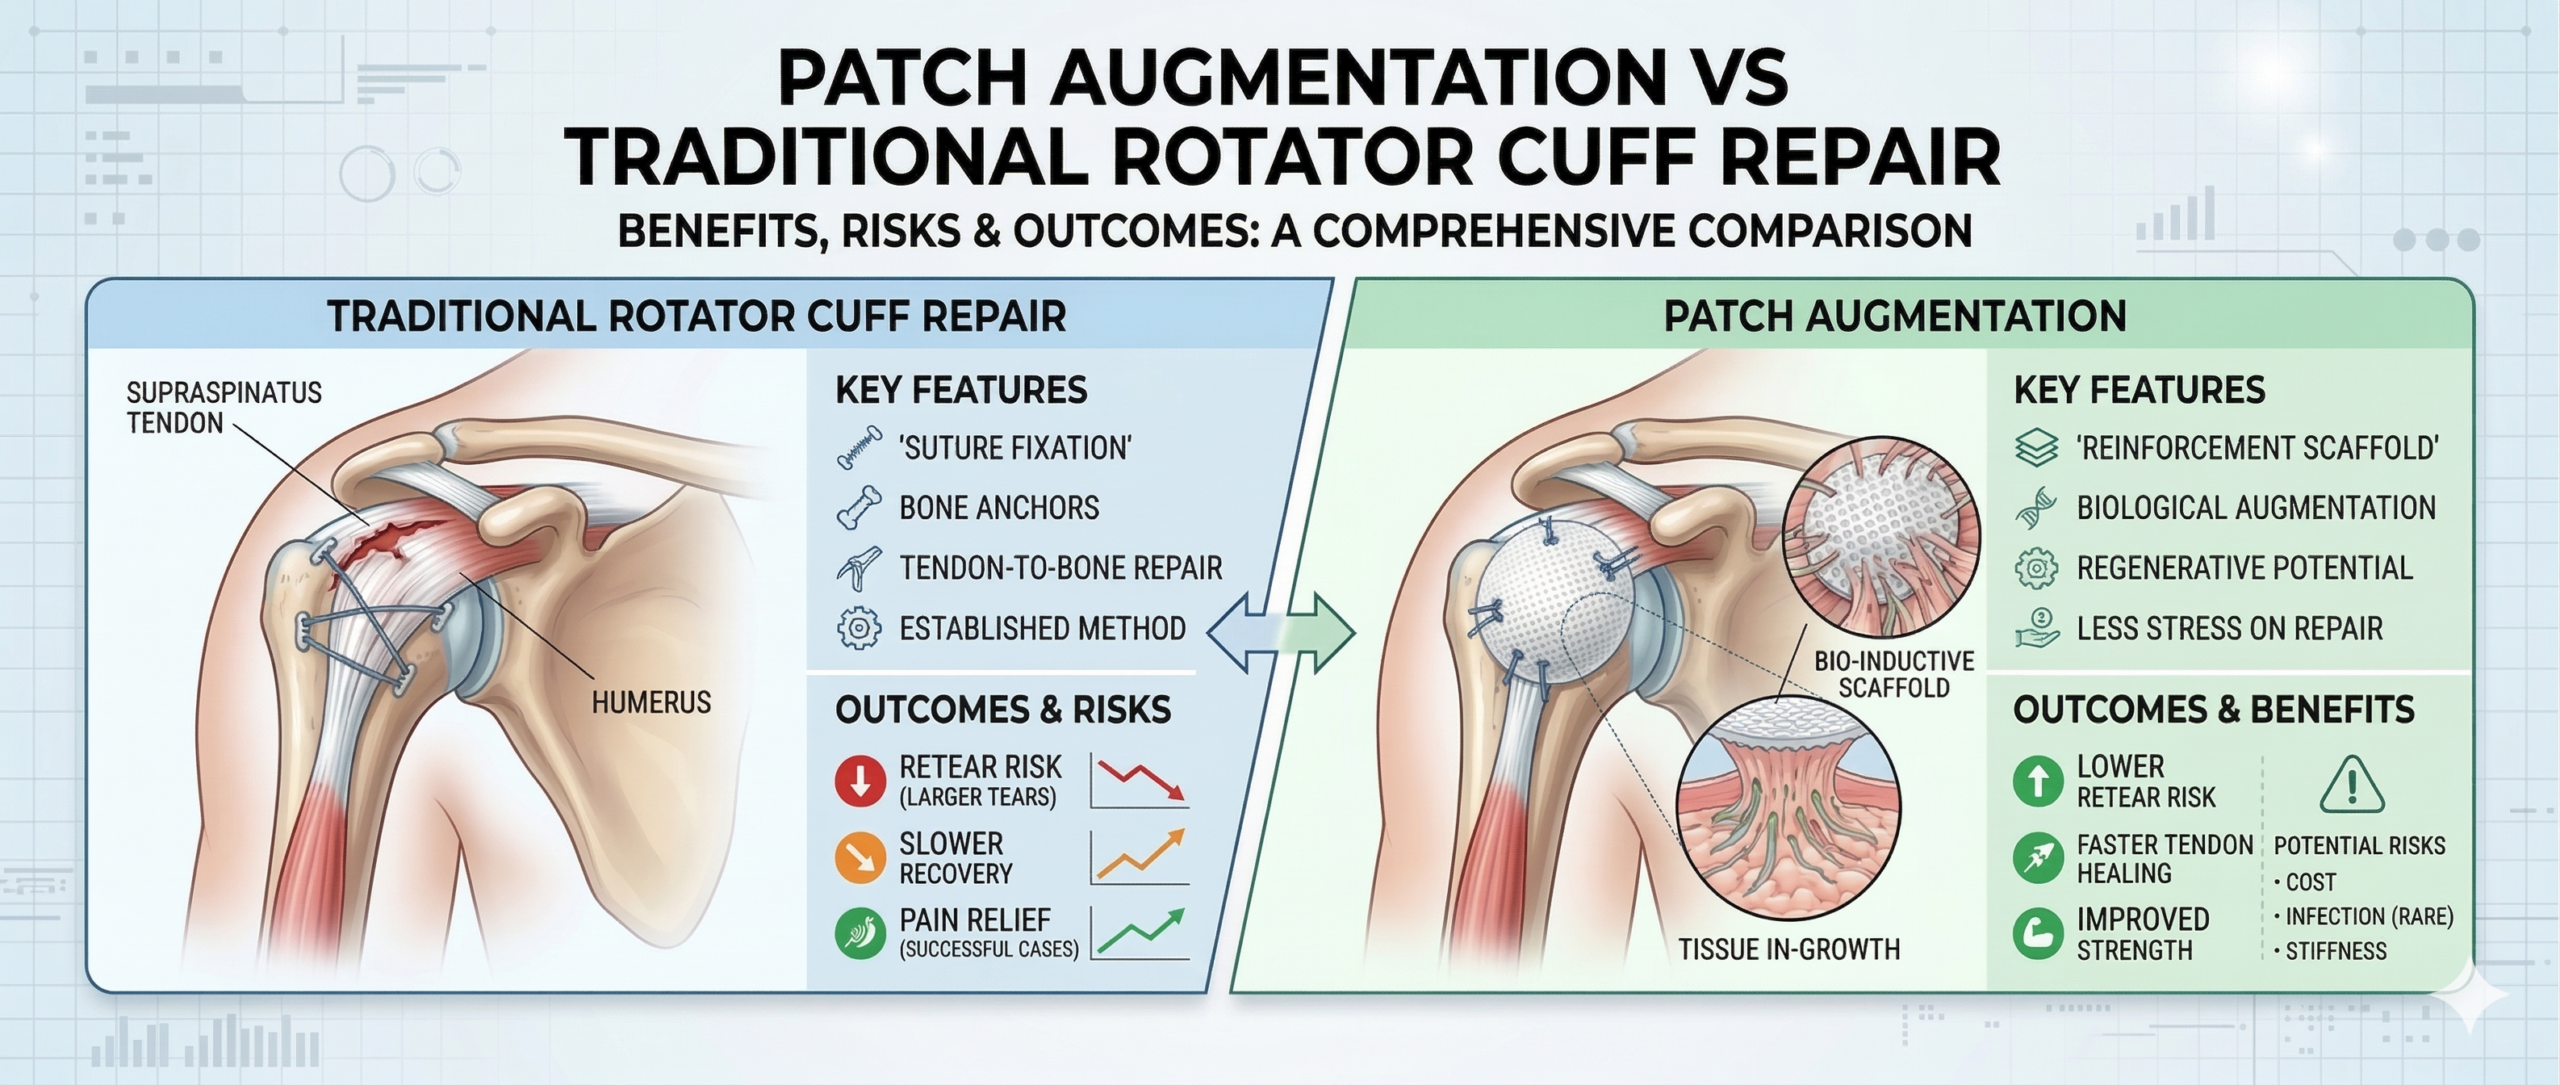
Key Differences at a Glance

FactorTraditional RepairPatch Augmentation
Tear SizeBest for small to medium tears.Designed for big, substantial ones
Tissue StrengthRelies on your naturally strong tissue.Supports weak or degenerated tissue, like in elders
Healing SupportCounts entirely on natural biological healing.Offers enhanced “scaffold” support for amelioration.
Re-tear RiskHigh, in case of big and sophisticated tearsMuch lower due to added reinforcement.
ComplexityA standard, highly effective procedure.An advanced technique requiring specialized skill.

 Benefits & Risks

Let’s look at the different rotator cuff surgery benefits and cons relatively:

(A) Traditional Operation

Advantage perspectives:

● Got a solid, proven track record, worldwide

● The procedure comes within the budget of many since a minimum number of specialized tools are needed.

● Quick procedure time under anesthesia for the patient.

Risk factors:

● In larger tears, the “failure rate” is higher because the tension on the sutures may be too great.

● If your tissue is as flimsy as tissue paper, traditional sutures may yield within a quick span of time.

(B) Patch Augmentation

The Edge:

● Imparts unmatched strength by incorporating a “belt and braces” approach to shoulder stability.

● Notably enhances the success rate for massive tears that were previously considered irreparable.

● Lower Re-issue: The patch distributes the load, safeguarding the repair during the vulnerable early healing phases.

Risk factors:

● Greater expenses: The specialized patch material adds to the overall surgical cost.

● Slightly longer surgery: It takes extra time for surgeons to precisely place and secure the patch.

● Needs mastery: This is an advanced procedure that should only be performed by surgeons experienced in bio-inductive technologies.

Outcomes & Recovery

Irrespective of the method chosen, the ultimate motive of your shoulder treatment should be to relieve you of your pain and restore strength.

How recovery looks like:

Achieving comfort: Both methods are highly effective at reducing the chronic “night pain” associated with rotator cuff tears.

Physiotherapy is a must: Whether you are treated with a patch or traditionally, your commitment to a structured rehab plan is the deciding factor to success.

Timeline: Most patients spend 4–6 weeks in a sling, followed by several months of strengthening. While the patch may speed up biological “thickening” of the tendon, the physical therapy timeline remains similar to ensure the bone-to-tendon bond is robust.

 Which Option Is Better for You?

Not every shoulder structure is the same, and neither is the condition of the rotator cuff tear of every patient. So, consider that your surgeon will recommend your treatment module based on:

1. The severity of the tear: MRI imaging will reveal the extent of the damage.

2. Status of your tissue: Often, decisions are made “on the table” once the surgeon can physically see the health of your tendons.

3. Lifestyle and age: The requirement of an athlete might only be satisfied by the extra patch, whereas a dormant patient can lead a happy life after a traditional one.

Start your Correct Shoulder Treatment Today

By now, you know what treatment is best for minimal and maximum rotator cuff tears. But ensure that you don’t take any action unless suggested by an orthopaedic doctor. It’s always better to identify your doctor and start the diagnosis as early as possible.

Any wrong step in your early treatment can cause long-term trouble and pain, so consult an expert at each step. If you are still sceptical about rotator cuff surgery risks, find the best surgeon in Mumbai through our platform at shoulderandkneeclinic.com.

FAQ

1. Do I really need patch augmentation for my shoulder tear?

Not always. Many people do well with a standard rotator cuff repair, especially for smaller tears. Your doctor will suggest a patch only if your tendon needs extra support.

2. Will I have big scars after the surgery?

No, in most cases the surgery is done with small keyhole cuts. So the scars are tiny and usually fade with time.

3. When can I get back to my normal routine?

You can start doing light activities in a few weeks, but full recovery takes a few months. Following your physiotherapy plan is really important.

4. Can my rotator cuff heal without surgery?

Sometimes, yes especially if the tear is small. But bigger or complete tears usually need surgery to heal properly and avoid long-term problems.

What Is Patch Augmentation in Rotator Cuff Repair and When Is It Recommended

What Is Patch Augmentation in Rotator Cuff Repair

Shoulder pain due to rotator cuff tears can deteriorate your overall health condition. It might affect your hand mobility, limiting your daily movement. In most conditions, the tears affect the tendons that help stabilize your shoulder joint, in case of aging, trauma, or overuse. Several medical reports suggest that in case of dire conditions, standard surgical repair might fall short.

If you are suffering from advanced tear issues, patch augmentation rotator cuff surgery can help you recover perfectly over time. It’s a proven technique that restores strength and exponential healing of your shoulder.

We will discuss more about it in this article. But before you jump to conclusions, consult an expert. Let’s start, shall we?

What Is Patch Augmentation in Rotator Cuff Surgery

It is an advanced surgical technique designed specifically for you if your rotator cuff tear requires more than a basic repair. During the procedure, your surgeon will be using a graft or a patch to reinforce and augment the repair of a torn rotator cuff tendon. It is generally fixed on top of the repair with sutures or anchors to provide additional strength and support to the healing tissue.

This patch acts as reinforcement, distributing stress across the tendon and encouraging your body’s natural healing process. It’s seamlessly integrated into your surgery, often using minimally invasive tools to minimize your recovery time.

Why Patch Augmentation Is Used in Rotator Cuff Repair

Not all cases need rotator cuff repair with patch augmentation. Your orthopaedic surgeon will diagnose the tear first and then recommend, if required. And there are three main reasons why they recommend this type of surgery to patients:

  • Strengthens the repair: It provides substantial mechanical support, preventing your tendon from pulling apart under regular strains.
  • It aids in healing: the patch will help promote the generation of tissue and further stimulate blood supply to the area by providing access to growth factors.
  • It decreases the possibility of subsequent tears: this option is especially important for individuals with high-risk tears, as it will decrease the failure rates of the repair and allow for a quick recovery of strength.

Consider this patch as in the case of steel cables to a bridge. It holds your rotator cuff to get that extra longevity it needs to balance.

When Is Patch Augmentation Recommended for Rotator Cuff Tears

Most orthopedic surgeons recommend this type of rotator cuff surgery only in cases that involve:

  • Significantly sized tears (greater than 3 centimeters) that cannot be treated with traditional techniques.
  • Aged patients with a bad tendon condition
  • Already, surgery has been performed on the patient, and this is the second time
  • The lifestyle of patients that revolving around heavy tasks or sports

Benefits of Patch Augmentation in Rotator Cuff Repair

The benefits of this kind of rotator cuff repair mainly indicate long-term impact: You gain:

  • Increased strength of the tendon: Reports indicate there may be repairs that are up to 50% stronger than previously repaired tendons, with up to 30% less chance of being retorn.
  • Faster healing time: The patch, in effect, acts as an extra biological unit. This will speed up how quickly your body can regrow tissue, and as a result, can often be completed in less time.
  • Improved stability and function: You will have an excellent range of motion and will be able to use a greater amount of your strength for everyday things.
  • Pain relief: You will not have any lingering pain after you have healed from your surgery, and you will have no trouble sleeping or resting.  

And it’s nothing new. Patients with rotator cuff have reported returning to their hobbies and work life in no time.

Types of Patches Used in Rotator Cuff Surgery

Experienced surgeons select the ideal patch based on your tear’s specifics, ensuring biocompatibility and effectiveness. There are two main types:

  • Biological patches: Derived from human or animal tissues (e.g., dermal allografts or xenografts). These are absorbable, integrating fully into your body over a span of 6-12 months. Simultaneously, they promote natural regeneration. Ideal for you if tendon healing is the priority.
  • Synthetic patches: These are manufactured from sturdy materials like polyester mesh or polypropylene. These, being non-absorbable and permanent, offer mechanical leverage for the long term. Ideal for big tears or poor tissue quality.

Most surgeons discuss the good and the bad during the pre-operation phase. The suggestions are relative to your age, activity level, and anatomy for best results.

Recovery After Rotator Cuff Repair with Patch Augmentation

Recovery of patients after a successful shoulder patch augmentation surgery is pretty quick compared to other types. The journey somewhat goes like this:

  1. Immobilization (0-6 weeks): Patients are given a sling to protect the repair. Gentle free-hand exercises to be done upon consultation.
  2. Physiotherapy (6-12 weeks): At this stage, therapists guide patients from passive strength exercises to active ones gradually.
  3. Full activity (3-6 months): If things progress well, patients can return to a desk job after 3 months, and athletes can resume their practice sessions after 5 to 6 months.

If you are a patient who has just undergone the medical procedure, remember to consult your physician before progressing to each step.

Who Is a Candidate for Patch Augmentation

Rotator cuff tear patch augmentation is not for everyone who requires surgical intervention. It’s only ideal for:

  • Those with substantial tears (greater than 3 cms) or multi-tendon involvement.
  • Patients with degenerative, retracted, or fatty tendons.
  • Individuals needing revision after failed repairs.
  • Active adults, like athletes or those who play contact sports, seeking durable outcomes.

At the end of the day, it is not your call to identify your issue and claim your candidacy. Always go for a proper diagnosis from a healthcare centre and then make an informed decision.

Final Takeaway

Look, a patch augmentation rotator cuff surgery is recommended only to certain patients having special shoulder conditions. No doubt, it helps in quick tendon strengthening. Here, a patient needs a proper orthopaedic surgeon who can guide them throughout their procedure till their recovery.

If you are a patient, you need to start your treatment early. You don’t want more complications in your rotator cuff injury, do you? So, if you are still confused, book a consultation with Mumbai’s best orthopaedic surgeon today. How? Well, visit our platform, and you are all sorted.

10 Shoulder Strengthening Exercises to Prevent Shoulder Impingement and Tears

10 Shoulder Strengthening Exercises to Prevent Shoulder Impingement and Tears

The shoulder forms a very integral part of our body, facilitating seamless activities throughout the day. From the moment you wake up till the time you go back to bed again, your shoulders are the ones that keep your hand movement sane. And an injury to the same can disrupt your lifestyle upside down, isn’t it? 

At Shoulder and Knee Clinic, our experts have comeup with this insightful blog where you will unlock the best 10 shoulder strengthening exercises to help strengthen your shoulders. Before hopping onto them, ensure that you consult a physician or an orthopaedic surgeon. And even prior to that, you should know why strengthening your shoulders matters. 

Why Shoulder Strengthening and Stability Matter

You rely on your shoulders for nearly everything: reaching overhead, pushing doors, or even sleeping comfortably. The rotator cuff, a group of four muscles and tendons, stabilizes your shoulder joint, keeping the humerus head securely in the socket.

Any sign of weakness in your shoulder can bring down the quality of your lifestyle. Sometimes excessive strain of tendons causes impingement, where tissues get pinched, leading to swelling and pain. With time, this leads to tears, especially if you are into contact sports or mundane tasks. 

Strengthening your rotator cuff maintains proper alignment and joint stability. These shoulder stability exercises reduce tendon strain, enhance posture, and lower injury risk in daily life and athletics. You’ll notice better endurance, less fatigue, and enhanced performance. Let’s take a deep dive into them in the next section.

10 Shoulder Strengthening Exercises to Prevent Injury

You should know that practicing the exercises below by itself won’t bring results. But practicing them correctly and at the right frequency and time matters. It is generally recommended to start with 2 to 3 sets, comprising 10 to 15 reps each. These might involve using light-resistant bands or the strategic application of your body weight. Consult an expert orthopaedic for personalized tweaks:

  1. External Rotations with Resistance Band
    Using a light band, anchor the band at the waist level to a door, standing with your side to the door (with your body facing away from the door). The opposite arm should be holding the band with an elbow bend at 90 degrees, with the arm tucked into the side. Then, as you rotate your arm outward against the resistance of the band, keep your elbow at the same position. Doing this exercise will focus on strengthening the Infraspinatus muscle along with the Teres Minor muscle.
  2. Internal Rotations with Resistance Band
    Using the same band setup, instead of standing sideways, now stand facing the anchor of the band. Pull the band from the band anchor across the body while pulling the band into your centerline (e.g., pulling to your left side). Focusing on controlled internal rotation of the shoulder. This will help strengthen the Subscapularis muscle, which is an important muscle for balancing the rotator cuff muscles (Infraspinatus/Teres Minor).
     
  3. Squeeze the Shoulder Blades
    Do it while sitting or standing in a straight position, as if you were pinching a pencil between them. Hold for five seconds, then slowly release. This exercise helps build the strength of the Rhomboids and the Trapezius, which are two significant muscles necessary to improve posture and control of the scapula.
  4. Wall Push-Ups
    Face a wall, hands shoulder-width apart at chest height. Bend elbows to lean in, then push back. Keep your body straight while doing it. This low-impact move enhances pectoral and deltoid stability without joint stress.
  5. Dumbbell Front Raises
    These are great to strengthen your Anterior Deltoids. Hold a light dumbbell (or a water jug) next to your hips with both hands and slowly raise up until your arm is parallel to shoulder height. Turning your thumbs up towards the ceiling as you raise.
  6. Dumbbell Lateral Raises
    These target your Lateral Deltoids. With your elbows bent slightly, lift your arms out in front of you to shoulder height. This exercise isolates the Lateral Deltoids and helps to prevent injury during overhead movements.
  7. Scaption Exercise
    In this one, raise your arms at a 30 or 45 degree angle forward and outward (thumb-up plane), mimicking natural shoulder motion. Ideal for the supraspinatus, the most common impingement site.
  8. Isometric Shoulder Holds
    Press your hand outward, inward, forward, or backward against a wall without moving your arm. Hold this position for at least 10 seconds. This builds endurance without dynamic strain.
  9. Prone Y and T Exercises
    Lie face-down on a mat.
    1. For Y: extend arms overhead in a Y shape, lift gently. 
    2. For T: position your arms out to the sides like a T, and lift. These activate lower traps and rear delts for posterior stability.
  10. Wall Angels
    Another interesting yet subtle exercise in this category. Stand against a wall and bend your arms at 90 degrees like goalposts. Now slide them up and down, keeping contact with the wall. Improves mobility and scapular rhythm to avoid pinching.

How Often Should You Do These Exercises

In short, you should remember that consistency is the key to building your shoulders. Whether you are practicing rotator cuff strengthening exercises or the ones that prevent impingement, you have to have a routine. Normally, it is suggested that you practice 3 to 4 times per week, which gives room for rest and recovery. Here’s a quick ideation of routine according to levels:

  • Beginners: 10 reps per set, light bands or no weight.
  • Intermediate: 15 reps, moderate resistance.
  • Advanced: Add holds or increase to 20 reps.

It is recommended to progress gradually as strength builds up. Also, keep a track of your improvements to avoid overdoing them. Subsequently, have an overall knowledge of both shoulder impingement and rotator cuff injuries, in case you already met with an accident. Even orthopaedic experts suggest blending these exercises with subtle warm-ups like arm circles for the best results. 

When to Stop Exercises and See a Specialist

Being consistent doesn’t mean that you will keep practicing the above-mentioned exercises even though it hurts you. Always listen to your body and pause immediately if you feel uneasy or you’ve hurt yourself. Here are some key indicators that you can follow:

  • Sharp or worsening pain beyond mild soreness.
  • Increased weakness or instability.
  • Restricted movement or swelling.

These signal potential impingement or tears that call for professional eyes. Once you do that, the surgeon or expert will advise you on certain diagnostic steps, like an MRI or an ultrasound. And post that result, you will be advised accordingly. 

Final Thoughts

Consistent shoulder strengthening and stability exercises can significantly cut your risk of impingement and rotator cuff tears. By integrating these 10 moves, you’ll foster long-term shoulder health and enjoy pain-free living. But at anyday, it is recommended to consult an expert before moving forward. And you should also know when to pause your exercises as well.

Still confused about where to start? Consult with Mumbai’s top orthopaedic surgeon today at shoulderandkneeclinic.com.

Custom Shoulder Replacement Explained: How It Works & Why It Matters

Custom Shoulder Replacement

Shoulder replacement surgeries are quite popular, especially among athletes and older people. Now, off-the-shelf implants work in conditions where the shoulder architecture is somewhat intact and the patient’s shoulder structure matches the common man. But when neither condition favours, one has to go for custom shoulder replacement. Here, you will find the inclusion of custom implants. And these are important for patients with complex anatomical challenges, such as severe deformities or glenoid wear, offering a customized solution that enhances joint comfort and functionality.

It was the need of the hour, and very few healthcare centres with top surgeons offer the same. The reason being- this procedure involves advanced imaging, precision decision, and flawless surgical planning, utilizing next-level technologies like 3D printing and others.

So, if you are seeking a shoulder replacement that will be tailored to you, then you are in the correct space. At Shoulder and Knee Clinic, we’ve curated this blog with the help of our most experienced orthopaedic surgeons in Mumbai. Read on to know more about how a personalized shoulder replacement works and why it has a great impact.

What Is a Custom Shoulder Replacement?

As mentioned earlier, a customized shoulder replacement is nothing but a shoulder procedure that is tailored to your shoulder anatomy. Rather than improvising a regular implant, your surgeon utilizes a detailed scan and computer modeling to form an implant. The process requires next-level imaging, meticulous surgical parameters, and a futuristic approach, like a 3D printed shoulder implant. The final result is that it fits the exact contours of your shoulder. Since there’s a perfect match between your bone and the implant, you get a seamless movement and enhanced steadiness.

If you are still wondering, traditional shoulder replacements incorporate pre-manufactured implants. It is feasible in most patients, but especially when the shoulder is not extremely deformed. They come in various sizes/dimensions. Over the years, it was observed that when patients with extreme conditions were treated with the hit-and-trial method, it was not fruitful. So, this gap was bridged by the custom replacements. This gave rise to the popularity of patient-specific shoulder surgery.

How Custom Shoulder Implants Are Designed

Now that you understand what a custom shoulder implant entails, here’s a detailed insight into how a custom shoulder implant is incorporated, step-wise:

  • Imaging: The patient undergoes detailed scans like CT or MRI to capture his or her shoulder anatomy in high resolution.
  • Digital modeling: A special software converts these images into a 3D digital model. Yes, the shoulder replacement technology has gone that far!
  • 3D printing: Using medical-grade elements, the patient-specific implant is then formed.
  • Implantation: Optimal alignment of the implant is achieved by your surgeon. It requires quite some precision.

So, even before entering the operating room, your surgeon can visualize your shoulder anatomy clearly. Remember that preoperative studies offer insights into each patient’s unique challenges, beyond just capturing images. A thorough imaging allows surgeons to identify areas of bone loss, deformities, or other issues, right to the point.

These digital tools help surgeons visualize your anatomy before even entering the operating room. Computer-assisted planning and 3D printing help reduce complications and allow prompt surgical procedures.

With a personalized implant, you happen to step into the right path from Day 1. You benefit from precise fit, better bone preservation, reduced surgical time, and faster recovery.

Why Custom Shoulder Replacement Matters

If you are a patient suffering from shoulder impairment, your goal is to immediately return to normal movements, isn’t it? Though recovery and rehabilitation have a special role to play in the end, a personalized shoulder replacement always helps to achieve your recovery goals. From improved range of motion to making you feel confident within weeks, you will be on cloud nine in no time.

This approach is particularly valuable if you have complex anatomy, deformities, or have undergone shoulder surgery in the past. If you are going through challenges in shoulder motion even after a traditional surgery, you can think of going for a custom replacement, only after consulting with a surgeon.

Standard vs Custom Shoulder Replacement: Key Differences

FeatureStandard Shoulder ReplacementCustom Shoulder Replacement
Fit & PrecisionAvailable in fixed, standard sizesTailored to your specific anatomy
Surgical ComplexityModerateSlightly higher due to personalized planning
CostLower upfrontHigher, but may minimize the chances of long-term complications
Recovery & LongevityGood outcomesPrompter recovery and improved longevity

According to your shoulder ailment, your surgeon will determine the right option. The key factors that they look for are: the condition of your shoulder, bone health, and lifestyle needs. In fact, they might use patient-specific instrumentation, which further enhances the accuracy of the implant placement.

Who Is an Ideal Candidate for a Custom Shoulder Implant?

The right candidate for a custom shoulder implant would be the one with either of the following medical conditions: bone deformities, severe arthritis, prior failed surgeries, or complex shoulder architecture. So, in these cases, it’s always recommended to go for a custom shoulder replacement in India.

At Shoulder and Knee Clinic, our experienced orthopaedic team begins with a detailed evaluation to comprehend your joint structure and daily activity level. Even if you plan your surgery other than our clinic, make sure that the surgeon who will operate on you has undergone specialized training. This is because this surgery requires one to accurately place the complex implants, involving advanced techniques and precision movements.

Recovery & Long-Term Outcomes

Rehabilitation is a vital component of achieving fruitful long-term outcomes after the custom shoulder surgery. You should know that physical or occupational therapy is a non-negotiable factor in the whole rehabilitation process. This helps patients to gradually enhance shoulder movement and regain strength. For the first few weeks, your arm is placed in a sling, and over the following months, you are expected to engage in flexibility and strength training.

While the longevity of customized implants is very high (15-20 years or more), it is recommended to take proper care and not to put strain in the early days. Keeping these practices intact, you can expect lasting results.

Conclusion

While the debate between standard vs custom shoulder replacement continues, you should know that it’s always best to consult an orthopaedic surgeon prior to taking any step.

If you feel that you are suffering from persistent shoulder pains or have suffered from an earlier failed surgery, reach out to us today. On our platform, you can book an appointment with the best orthopaedic surgeon in Mumbai within minutes!

Start your shoulder recovery journey with the right step forward with us today.

Arthroscopic vs Open Shoulder Surgery: Benefits, Risks, and Recovery

Arthroscopic vs Open Shoulder Surgery

Shoulder pain can drastically affect the quality of life, especially when the pain is experienced for a long period of time. But irrespective of the cause (shoulder instability, rotator cuff tear or fracture, etc), opting for the right shoulder surgery and how fast you recover makes all the difference. At Shoulder and Knee Clinic, we treat patients with deep empathy and offer consultations in the most personalized way possible. This is because we know how each shoulder is unique.

In this blog, we will try to comprehend the major differences between open shoulder surgery and arthroscopic surgery. It will also highlight their advantages, potential risks, and other intriguing insights regarding what to expect during recovery, so that you can make an informed decision before taking a major step.

All about Arthroscopic Shoulder Surgery

It’s a minimally invasive shoulder surgery that is used to diagnose and treat shoulder problems through very small incisions. In this surgical procedure, your surgeon will insert a tiny camera (arthroscope) into your shoulder joint, which displays the shoulder’s architecture, highlighting its current condition. Implementing these visuals as leverage, the surgeon performs accurate repairs using specialized (miniature) tools.

Conditions commonly treated with arthroscopic surgery include:

  • Rotator cuff damage– repairing torn shoulder tendons
  • Labrum repair (SLAP or Bankart lesions)– fixing torn cartilage around the shoulder socket
  • Shoulder impingement or bursitis– eliminating inflamed tissue or bone spurs
  • Minor instability or frozen shoulder

Benefits of Arthroscopic Surgery:

  • Minimal incisions and negligible scarring
  • Least tissue damage and post-surgery discomfort
  • Prompt recovery and shorter hospital stay
  • One can return to daily activities and sports much quicker

Risks or Limitations:

  • It’s not appropriate for sophisticated or heavy injuries
  • There’s a little risk of infection or rigidity
  • If visualization is limited, it might require an open surgery

All about Open Shoulder Surgery?

This type of surgery involves a greater incision through which your surgeon gains true knowledge of your shoulder joint condition. This approach is typically chosen for serious injuries, complex reconstructions, or cases where arthroscopy shoulder surgery isn’t applicable.

When do doctors recommend this type of shoulder surgery recovery?

  • When it’s about rotator cuff repairs relative to numerous tendons
  • Shoulder replacements (arthroplasty)
  • Shoulder joint repair, such as fracture fixation or bone grafting
  • Revision surgeries (if previous arthroscopy failed)

Why this surgery gives you an edge:

  • Offers better visualization of the joint and surrounding structures
  • Allows complex reconstructions and large tendon repairs
  • Direct control access for flawless correction

Risks and Limitations:

  • Larger incision leading to more tissue trauma
  • Increased pain and scarring
  • Prolonged hospital stays and shoulder surgery recovery period
  • Higher risk of stiffness and infection

Major Differences Between the Two Surgeries

For your quick understanding, here’s a detailed matrix, showcasing the shoulder surgery comparison.

FactorArthroscopic SurgeryOpen Surgery
Incision SizeSmall (1–2 cm)Large (8–10 cm)
Tissue DamageMinimalModerate to significant
Recovery Time3–6 months6–9 months
Hospital StayUsually day care or 1 day2–3 days
Post-surgery PainLessMore
Complex RepairsLimitedSuitable for complex cases
ScarringMinimalVisible
OutcomeExcellent for minor-to-moderate injuriesExcellent for severe or complex injuries

How do you comprehend that a particular one among the two will be appropriate for you?

For instance, if you have minor to moderate shoulder damage, such as a small rotator cuff or labrum tear, arthroscopy offers faster recovery with minimal scarring.
However, if your shoulder issue involves multiple tears, bone fractures, or arthritis, open surgery may be the more effective option. Ultimately, an experienced surgeon would be the ideal person to identify your issue and give recommendations.

Recovery After Shoulder Surgery

The road to complete recovery is not an easy journey. It tests patience, resilience, and commitment through proper rehabilitation. Here’s a quick look at how the journey looks in different scenarios:

Arthroscopic Surgery Recovery:

  • First 2 weeks: You would be using an arm sling. Pain and swelling are controlled with medication and ice packs.
  • Weeks 2–6: Follow some strategic exercises as directed by your physiotherapist.
  • Months 3–6: Normalcy in shoulder muscles, and you regain flexibility. Most patients return to regular activities within 4–6 months, so you can expect something similar.

Open Surgery Recovery:

  • First 3–4 weeks: To safeguard the repair and steady recovery, sling support and limited movement are to be kept in check.
  • Weeks 4–8: You should be into subtle physiotherapy under supervision.
  • Months 3–9: Progressive strengthening and stability training. Complete recovery may take up to 9 months, depending on the surgery’s complexity.

Though we’ve discussed physiotherapy in these shoulder ailments, there are some tips that you can follow for the best results:

  • Your surgeon’s or physiotherapist’s instructions should be kept as a high priority
  • Avoid lifting heavy weights or overhead movements early on.
  • Practice regular stretching to prevent stiffness.
  • Attend all follow-up appointments to track your progress.

Which Shoulder Surgery is Right for You?

Though by now you have got an idea regarding the answer to this question, here’s a quick recap based on several elements:

  • Age: Younger, active patients may benefit from minimally invasive arthroscopy.
  • Activity Level: Athletes or those with demanding physical routines may prefer faster recovery.
  • Injury Severity: Complex tears or fractures may require open repair.
  • Lifestyle: If you need to return to work or sports quickly, arthroscopy might suit you better.

Conclusion

You should understand that every shoulder is different, with different strengths and architectures. So, the best step towards a successful recovery journey would be to consult an orthopaedic surgeon.

At Shoulder and Knee Clinic, we follow a patient-first approach, which is bound to help patients get personalized treatment and thus experience speedy recovery. So start your journey with the best orthopaedic surgeon in Mumbai by booking a consultation with us today!

Who Needs Bankart Surgery? Causes, Symptoms, and Candidacy

Who Needs Bankart Surgery?
person sufferring from a Bankart lesion

Long answer short, the person who suffers from a Bankart lesion needs Bankart surgery. But that doesn’t quite answer the question comprehensively, does it? In fact, it called for subsequent questions like what Bankart lesions? What are the causes and symptoms of the ailment, and what does it entail? 

In this blog, we will be discussing all those questions, starting with what Bankart lesion is and other intriguing insights relative to the same. 

What You Need To Know About Bankart Lesion Injury
It is an ailment that occurs at the fore-end part of the fibrocartilaginous structure of the shoulder. For people in their early years (especially athletes who are involved in contact sports), they should refrain from getting their shoulder sprained because it opens a door to future shoulder issues, such as unwanted imbalances. To have a holistic idea of the ailment and its occurrence, one needs to have knowledge of the layout of a human shoulder. We all know that the shoulder mimics a ball-and-socket joint, don’t we?  Just take note that the labrum is a significant part that assists in the positioning of the shoulder joint.
Now, to help you navigate how Bankart lesion occurs, here is a quick gist- this ailment arises when the shoulder is put through a sudden stress, generally due to a disturbing/unwanted moment. The assertive parting of the shoulder cartilage (a.k.a. labrum) from the fibrocartilaginous structure leads to this type of condition. 

The Causes Regarding This Injury

One needs to be aware of the reasons that lead to the Bankart injury. This will help you to stay aware of such circumstances and thus prevent them from happening. Here are the prominent reasons in detail-

  • Twist of the shoulder- Substantial distress or injury is often the trigger factor behind an initial shoulder imbalance. To be specific, the labrum tear happens when the head of the humerus displaces and injures the socket bones and ligaments in front of the shoulder. Another information to take note of is that the first imbalance can lead to subsequent imbalances and instill a feeling of insecurity. This leads to the next cause as described below. 
  • Repeated shoulder unsteadiness- if you have a medical history of shoulder ailments, then you are prone to this ailment. With each historic issue you have faced, its effect has accumulated and has led to the Bankart ailment today. 
  • Susceptibility related to genes- this reason is not so prevalent in nature. Genetic factors (where parents and forefathers suffered from hypermobility syndromes) might play a vital role in your Bankart injury. 

Symptoms to Watch Out For

Perceiving a Bankart lesion involves identifying specific traits related to shoulder disbalances-

  •  Aches and uneasiness- particularly when performing movements that point above your shoulder.
  • Restricted range of movement- If you experience lower flexibility in your arms and uneasiness to move them to angles that they should move, then you can consider it a symptom. 
  • Dislocations occurring repeatedly- if someone is experiencing recurrent dislocations, then it is considered to be a high symptom indication. This needs an urgent and thorough investigation, which might be the case of a Bankart lesion. 

Who Specifically Needs Bankart Surgery?

These days, the therapies for Bankart impairment are many and vary based on the seriousness of the ailment. It also depends on the overall health conditions of the patient. Here are some of the generic therapy options-

  • Physical therapy- Conditions where there is a subtle imbalance, this kind of treatment is more than enough to reinstate shoulder balance. This helps minimize the chances of further dislocations.
  • Alteration in lifestyle- Sometimes patients are advised to avoid work/movements that can add to shoulder strain. This allows healing at a faster pace. 
  • Shoulder Bankart surgery is recommended for patients with substantial instability or persistent dislocations. To help you comprehend its candidacy, we will discuss Bankart repair surgery in depth in the next section. 

How Candidacy is Determined for Bankart Repair Surgery

A Bankart surgery is basically a surgical procedure that corrects recurrent shoulder dislocations by refastening lax ligaments to their natural positions in the shoulder joint and generally involves re-binding the torn labrum. 

A proper candidacy is established based on a few common grounds and symptoms. These include-

  • Repetitive dislocations or instability
  • Conditions where a Bankart lesion is confirmed
  • Requirement for better shoulder functions
  • Initial injury occurring at a young age, which makes the chances high for future recurrence
  • Dislocations faced by athletes involved in contact sports

Conclusion: Early Bankart Treatment for a Better Lifestyle

Patients with Bankart injury achieve fast recovery post their surgical treatment and rehabilitation, or through recommended home remedies. That depends on the level of injury that occurred and the patient’s history. 

But in either case, one has to start their treatment early. If you are suffering from a Bankart injury and its subsequent aftermath, go for a checkup and early consultation from a reputed orthopaedic doctor and surgeon. Get consultation from the best surgeon in Mumbai at our Shoulder and Knee Clinic. Book a prompt appointment today at shoulderandkneeclinic.com for a better lifestyle tomorrow.

Top 7 Exercises to Relieve Shoulder Pain at Home

Top 7 Exercises to Relieve Shoulder Pain at Home

General Tips Before Starting

Shoulder pain can really affect your lifestyle, which hampers regular activities like doing the groceries or playing a simple sport. It can be a result of an injury, bad posture, or the wear and tear of everyday activities. But achieving relief from such pain might feel like an impossible task.

To address this challenge, we will be discussing 7 proven and effective shoulder pain exercises that you can practise at home to reduce the pain. In the long run, these will not only alleviate the discomfort but also help regain mobility.

Key tips prior to practicing these exercises

To mitigate shoulder pain, carry out this training in a periodic manner. The subtle amount generally lies within three to six times a week. Initiate with a ten-minute session and steadily increase the period as you advance towards normality and become more flexible.

During these training sessions, try to concentrate on relaxing and letting out any feelings of rigidity within your body.

Remember to do only those motions that your body allows in a seamless way. Don’t make things complicated for your physique or make movements that feel too much for your body. Discontinue the exercise if you start experiencing excruciating pain.

Top 7 Shoulder Pain Relief Exercises

1. Pendulum Stretch – Gently loosens the joint

This one is considered one of the most generic shoulder pain exercises at home. People also do this when they are suffering from frozen shoulder. It involves suspending your arm by your side and moving it in a small, circular motion. In the initial days, you can go with a small circling motion, and with time, you can steadily increase the diameter of the circling motion.

Pendulum Strectch

2. Crossover Arm Stretch – Targets the rear deltoid and relieves tension

It caters to the health of your shoulder muscles. Make one hand go over your body at the shoulder level and steadily haul it towards your chest by applying your other hand. Hold the position for fifteen to thirty seconds on each side to relieve rigidity and enhance flexibility.

It is highly beneficial for those who spend extended hours at the desk or participate in mundane overhead activities. It also increases flexibility and minimizes the risk of injury.

Crossover Arm Stretch

3. Doorway Stretch – Opens up chest and relieves front shoulder pressure

It gives room to your chest and shoulders to function appropriately. Go near your room’s door and place your arms on its frame. Keep your elbows at the shoulder level. Steadily bend onward till you get a feeling of strain on your chest. Stay in this position for around fifteen to thirty seconds and repeat the same up to 3 cycles.

Doorway Stretch

4. Wall Angels – Improves posture and mobility

    To execute this workout, put your back against a wall and steadily move your feet away from the foundation. Raise your arms to form a “W” shape, keeping your elbows pressed against the structure throughout the movement. Subsequently, move your arms upside down into a “y” structure and return to the first position.

    This workout, too, helps in restoring your shoulder balance while fostering the correct human posture. Make sure that as you return to the first position, you are focusing on maintaining contact with the wall and managing your breath.

    Wall Angels

    5. Shoulder Blade Squeeze – Activates upper back muscles

    Among the renowned shoulder pain relief exercises is the shoulder blade squeeze. With practice, it toughens the muscles around the blades, helping in gaining the ideal human posture.

    To do this, you can either sit or stand with your arms hanging by your sides, just like in a normal posture. Now, squeeze your shoulder blades together as if you are trying to hold a pen between them. Maintain this position for five seconds and release. Iterate this cycle 10 times.

    Shoulder Blade Squeeze

    6. Towel Stretch – Helps with internal rotation and flexibility

    This is another recommended workout for frozen shoulder or shoulder discomfort. It is done by first draping a towel over the affected arm. Then hold the ends of the towel with the opposite hand and pull slowly on the towel while maintaining the elbow position close to the body. This position should be held for thirty seconds, and the cycle is to be repeated three times.

    Towel Stretch

    7. External Rotation with Resistance Band – Strengthens rotator cuff muscles

    It’s a very interesting shoulder pain relief exercise since it involves the use of a resistance band. To do this, take a resistance band and fasten one end at waist height. Hold the other end with your elbow forming a right angle, and gently swing your arm to the side, away from your torso.

    This unique workout helps toughen up the rotator cuff muscles while bringing in the required shoulder balance in the human body.

    External Rotation with Resistance Band

    Conclusion with CTA

    As we conclude these effective workouts for relieving shoulder pain, you should remember that practicing daily is the key. Yes, practicing these exercises regularly can lead to significant advancement in your mobility and comfort. Whether you are recovering from an injury or simply seeking solutions to alleviate your shoulder stiffness, these exercises are your ultimate gateway for relief.

    If you experience pain even after practicing these exercises for days or if you are unable to move your shoulder, you should consult a doctor immediately. Symptoms might also include fever with pain, so be cautious and consult an orthopaedic doctor at the earliest.

    Start your journey towards a better lifestyle today by booking the best orthopaedic doctor in Mumbai at shoulderandkneeclinic.com.

    Shoulder Day Gone Wrong? Here’s How to Recover from a Gym Injury

    Shoulder Day Gone Wrong infographic
    shoulder injury in the gym after workout


    Recognizing a Shoulder Injury After the Gym

    There’s always a high chance of undergoing a shoulder injury for people who go to the gym. The interpretations behind a shoulder injury in gym are many. But the question is- why are most of the cases related to the shoulder? Well, it’s mainly because of its importance to movements during gym workouts.

    Our shoulder joint is a typical ball-and-socket joint, with a formation like a golf tee, which offers a long range of motion to our arms. The socket is flat on top, rendering the ball of the upper arm bone flexible, but it also indicates that it is more prone to dislocation. In this blog, we will discuss how to identify a shoulder injury and how to recover from it effectively, while offering some intriguing insights.

    Now, there are many common reasons behind your shoulder pain after gym. Circumstances like overtraining, bad form, or sometimes avoiding the recommendations of gym trainers, like skipping warm-ups, can be some of them. Here are the types-

    • Rotator cuff injury- happens due to repetitive movements during overhead lifting. This relentless motion can lead to overload on the tendons, eventually developing tendonitis. If left untreated, it can result in a tear of the rotator cuff.
    • Another common condition known as “weightlifter shoulder” occurs when people do bench press, chest fly, etc. In these postures, since the elbows are lowered behind their shoulders, it causes extra stress to the joint and bones. Over time, this causes subtle fractures or tears.
    • Dislocated shoulders are another most common type among gym goers, where the ball at the top of the shoulder falls out of the socket.

    Early interventions and recognition of shoulder injuries help prevent minor issues from developing into chronic conditions. This minimizes the overall risk of the situation getting worse and thereby improves one’s lifestyle quickly.

    What to Do When You’ve Hurt Your Shoulder

    To make a full recovery from a shoulder injury, you need a thorough plan that includes both exercises and a steady progression. Here’s a step-by-step guide:-

    • RICE treatment- It is important in the initial hours of your injury. Take ample rest so that your body’s immunity takes charge and heals itself. You can also use a sling or brace (if recommended by a physician/doctor).
      Simultaneously, for shoulder pain quick relief,  apply ice packs to your shoulder for around 10- 20 minutes, a few times a day, to minimize the inflammation. You can go for OTC medications if suggested by your doctor to manage the swelling.
    • Physical Therapy Consultation- A proper physical therapy also falls in the steps of a proper shoulder injury recovery. Consult a physician who specializes in shoulder rehabilitation. He or she will assess your injury and make a customized recovery plan that involves appropriate exercises.
      In the meantime, while you are doing those stretching and strengthening exercises, try to avoid aggravating movements like pushing or pulling until the pain subsides.

    Suppose the pain persists even after you follow these steps for quite a while; it’s time to see a doctor. This is because it then indicates that the injury has undergone serious conditions like rotator cuff tears or impingement. Other indications are-

    • Pain persists even when you are not using your arm
    • Pain comes back the moment you resume activities
    • The intensity changes, i.e., shift from an ache to a sharp pain
    • New swelling or lump on or near the shoulder

    Seek the help of an orthopaedic surgeon who will evaluate your injury and recommend solutions that might or might not involve surgery. At shoulderandkneeclicnic.com, you can book an appointment with the best orthopaedic doctor in India within minutes.

    How to Avoid Shoulder Injuries in the Future

    When it comes to preventing your shoulder from any kind of injury, it’s all about preparation in the gym. Some key tips to prevent this kind of injury are given below: –

    • Focus on pulling exercises, rather than the pushing ones- take a note that when you are doing it the other way, you are putting more pressure on the front and chest muscles as compared to the back muscles. This causes a disbalance between the frontal muscles and the upper back. Ultimately, it leads to vehement internal rotation/rounding of the shoulders, causing pain and injury.
    • Do warm-ups and train your rotator cuffs- as it prevents extraneous movements that could lead to an injury. Stabilizing your shoulder girdle helps relieve the strain on your shoulder. Engage your shoulder blades by pulling them back and down before starting your exercise.
    • Physical therapists design tailored exercise programs to strengthen muscles, enhancing shoulder stability and minimizing the chances of injury. It might include mobilizing your thoracic spine, too.
    • Phasing your workouts helps- Avoid frequent shoulder workouts.  Training the same muscle group up to 3 times a week is typically sufficient to build strength while allowing for proper recovery.

    Complications start to accumulate if you ignore your shoulder pain. For instance, untreated shoulder issues can lead to septic arthritis- an excruciating joint infection that can cause rapid deterioration of cartilage and bone. So, conditions like these can cause permanent damage along with excessive medical costs.

    It’s always better to consult an orthopaedic doctor for proper shoulder pain treatment, rather than delaying it. Gift yourself a better lifestyle through shoulderandkneeclinic.com, where you can seamlessly book an appointment with the top orthopaedic surgeons in Mumbai, India.

    Can Sleeping Position Affect Shoulder Health? Tips for Pain-Free Rest

    Best Sleeping Positions for Shoulder Pain Relief infographic
    Shoulder Pain While Sleeping

    Your sleeping position at night or any time of the day (whatever your schedule suggests) is a crucial element of your shoulder health. And this becomes more elemental if you are already suffering from shoulder pain or had an ailment earlier.

    Poor sleep posture can put unnecessary stress on your shoulder joints, leading to stiffness, discomfort, and even long-term issues. You should take insights from experts in metro cities since they have the best ones.  Consulting a shoulder specialist in Mumbai should be your priority if the pain persists even after sleeping in the correct posture. This article will highlight how various sleeping positions contribute to shoulder pain and some sleeping tips to get you a pain-free rest.

    Sleeping Positions that Affect Shoulder Health

    1. Sleeping on Your Stomach

    This is considered to be one of the worst positions for shoulder health and eventually leads to discomfort. It forces your head to be turned to one side for long periods, straining the shoulders and neck.

    2. Sleeping on Your Side

    It’s a silent cause. At first, it feels comfortable. But it eventually puts excessive strain on the shoulder that you are lying on. This ultimately leads to inflammation, pain, and even conditions like bursitis or rotator cuff injuries over time. The condition deteriorates if your mattress is too firm or lacks support, leading to misalignment in your shoulder and spine.

    3. Sleeping on your Back

    This posture is considered to be the safest and best posture for spiral alignment and holistic joint health. But, if your pillow is too low or high, it can lead to misalignment, leading to shoulder distress. Some back sleepers might also suffer from shoulder pain if they sleep with their arms positioned awkwardly, such as under or overhead their bodies.

    Now that you are aware of the root cause, given below are some quick tips that even the best doctor for shoulder pain in Mumbai or other metro cities generally suggests.

    Have a Painless Rest by Following These Quick Sleeping Tips

    1. Utilize a Supportive Pillow

    Exercising this auxiliary pillow positions your spine and neck in an aligned position. This minimizes the stress on your shoulders. Bring home a pillow that supports the natural curve of your neck. The best materials you can get are contour pillows or memory foam. Ensure before buying that it aligns properly and is neither too low nor too high.

    2. A Side Pillow Enhances Easiness

    Sleeping while holding a side pillow positions your shoulders in a more easy state, thereby minimizing the strain. Try to practice sleeping holding a standard pillow or body pillow (cylindrical shaped) close to your chest while tilting on your side. This will position your shoulders to a more comfortable position.

    3. Try Alternating Your Side at Frequent Intervals

    This prevents the overloading of a particular shoulder and evenly distributes the pressure of your upper body.

    4. Optimize Your Mattress

    As mentioned earlier, a mattress should be optimal in terms of softness and firmness. A medium-level firmness is ideal for offering support and space to minimize pressure on your shoulders. If you are not in a position to invest in a new mattress, consider adding a mattress topper for extra comfort.

    5. Set a Pillow Between Your Knees

    Positioning a pillow in between your knees assists in maintaining the correct orientation of your spine and hips. This in turn minimizes the overall stress that can lead to shoulder pain.

    Get a rigid pillow or a customized knee pillow, when sleeping on your favorite side. This practice ensures that your spinal structure stays in the easiest position.

    Conclusion

    So, the sleeping position might seem like a mere account to keep a check when it comes to shoulder health. But when it’s neglected to the fullest, it can inflict distress on either of your shoulders or both. The tips mentioned above might help you alleviate your pain due to your bad sleeping postures.

    However, if you experience pain for a prolonged period, you should consult an experienced orthopedic, generally appointed in metro cities like Mumbai. Setting the right foot in your shoulder treatment, you can consult our distinguished surgical orthopedic Dr. Aditya Sai at shoulderandkneeclinic.com. Whether it’s about a frozen shoulder treatment in Mumbai or rotator cuff tears, our unmatched orthopedics with uncountable success stories up their sleeves are ready to give you a better lifestyle.